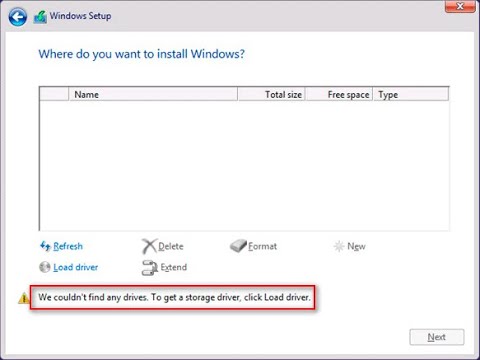
We could’t find any drives, To get a storage driver, click Load driver.
So you’re reinstalling a fresh copy or installing Windows first time on your new Intel based PC and Asus laptop in this case however when you reach the dialog where you have to select the drive where to install Windows no drives are visible and it says we couldn’t find any drives to get a storage driver click load driver the nvme SSD drive is definitely present in this laptop and it is visible in BIOS the problem Windows installation cannot detect it is the Intel processor inside this computer starting from Intel 11th gen and up Intel incorporates something that is called Intel volume management device basically that’s a proprietary technology that enables a sort of raid or obtained technology on your nvme SSD drives the problem with that is is that Windows 10 installation in this case was released before Intel 11th gen came along so your installation media doesn’t have drivers for that there are some unofficial Windows installation builds made by enthusiasts which already have those drivers included but I strongly advise you against using any unofficial Windows installation builds if you want to incorporate those drivers into the installation do it yourself however in this particular case there is actually no reason to use any kind of raid and this is a RAID technology since this is a laptop with only one SSD and no one is going to install another SSD to get them in RAID Mode there is a solution though I will be showing the solution on a laptop but it will be the same for desktop both brand and self-assembled and also Windows tablets and of course this solution will fix only this particular problem when you are sure that your SSD drive is completely functional and working in other devices but just for some reason on this particular machine Windows installation media doesn’t see the drive that’s what we are going to solve if your drive is not recognized because it’s broken this obviously won’t fix your issue so to make the drive or the drives visible to Windows installation you basically have two options the first one is disable Intel volume management device technology since you will probably see no benefit from that anyways it may slightly optimize power consumption but I seriously doubt that so if you want to go this route you have to go to your laptop bios I will be showing this in Asus laptop ufi bias however if you have a different brand of laptop you may have the same feature in a different place or the setting can be completely missing from your bias options so your mileage may vary anyway on this Asus laptop you have to go to the BIOS it Advanced scroll down the advanced settings find the setting which is called vmd setup menu and disable vmd controller it will be presented with a message that there may be a data loss or something however as we are reinstalling Windows or installing fresh copy of Windows we shouldn’t take that too serious anyway after the controller is disabled you can boot your Windows installation media back and this time around the drives will be visible here we have only one drive and since we are going for a fresh install delete all the old partitions until the entire Drive is unallocated and press next the windows install media will create all the protections for you windows will work just fine without vmd controller enabled and I doubt you will have any prefer performance loss however if you still want to use this controller you have to keep the controller enabled in BIOS and you will have to download drivers for Intel irst controller to the Windows installation media from which you are booting to install Windows you can find links to those drivers on your laptop manufacturer website for example Dell has them Asus has them and most of the other brands as well however you can also download them directly from Intel website this is the latest driver at the time I’m making this video there are several download options you can download the zip version with vmd after you download that you have to extract the folder directly to your Windows installation USB media in this case I put the files in the Intel directory however you may put them just in the root directory of the USB thumb drive you are installing Windows from you don’t have to recreate the image if you already have a Windows installation USB just copy the files directly to it boot back from this installation USB and when you reach the drive selection dialog select load driver browse to the folder on the USB drive where you have extracted the files select that folder and in some cases you will have to remove the tick which says show only compatible devices so after that you will have the drivers for Intel rapid storage technology which you can install and after that the Windows installation media will see your drives continue to install Windows and in this case the drivers for the controller will be installed automatically and you will have no problem booting into windows I don’t think there is any difference between those two methods the only difference being is if you don’t have access to any other computer to download the drivers and put them onto the USB drive you may go for the first option where you just disable the Intel vmd controller to be able to install Windows from the media you already have however if you have another computer where you can put the drivers onto the USB stick you may follow the second path
Download driver:
Intel website link – click
Asus website link – click
Dell website link – click