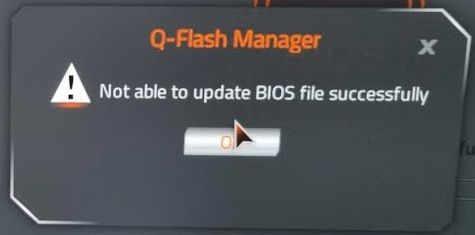
Updating the UEFI BIOS on your Gigabyte motherboard should be a straightforward process. Typically, you unzip the BIOS file onto a USB thumb drive, boot into your existing BIOS, and launch the Q-Flash utility. However, many users encounter an error preventing the BIOS update from completing successfully. This is a common issue across multiple Gigabyte motherboard models, spanning from 2016 to the most recent 2023 versions.
Despite the visual improvements in newer models, the error remains consistent. But don’t worry—this guide will walk you through the troubleshooting steps to resolve this problem effectively.
Possible Causes of the BIOS Update Error
There are two primary reasons why your Gigabyte motherboard may refuse to update its BIOS:
A specific issue related to RGB hardware.
A general issue related to BIOS profile settings.
Let’s go through each potential cause and the solutions.
Cause #1: External RGB Hubs Connected to USB Headers
Surprisingly, external RGB hubs can interfere with the BIOS update process. If you have an external hub for RGB fans connected to your motherboard’s USB header, it may cause the update to fail.
Solution:
Disconnect the external RGB hub from the motherboard’s USB header.
Attempt the BIOS update again.
If the update is successful, you can reconnect the hub after completion.
This issue is known to occur with RGB hubs from brands like Cooler Master and Aaco. Even if your hub is only powered by the PSU (and not connected to the motherboard), it’s worth disconnecting it temporarily to see if that resolves the problem.
If this doesn’t work, proceed to the general solution below.
Cause #2: BIOS Profile Settings Conflict
Many Gigabyte motherboards allow users to save BIOS settings as a profile. However, if an older profile is applied to a new BIOS version, it may contain outdated or incompatible settings. To prevent boot failures, Gigabyte may block the update altogether.
Solution:
Load Optimized Defaults:
Enter the BIOS setup.
Select “Load Optimized Defaults” to reset all settings.
You do not need to reboot at this stage.
Attempt the BIOS Update Again:
Extract the latest BIOS update file from Gigabyte’s official website.
Place it in the root directory of a FAT32-formatted USB thumb drive.
Use the Q-Flash utility to install the update.
In this case, we were trying to install version F14. Initially, it failed with the error message, but after resetting the settings, the update proceeded smoothly.
Additional Notes on Updating Gigabyte BIOS
If your motherboard supports BIOS updates from an NTFS drive (as F14 does), you don’t necessarily need a USB drive. You can update directly from your C: drive.
If your motherboard is several versions behind (e.g., skipping 10 updates over five years), try updating to an intermediate version first before installing the latest one.