So, you’ve got an HP laptop and you’re ready to do a clean installation of Windows 11 using a USB drive created with the official Media Creation Tool from Microsoft. You boot into the installer, everything seems fine… until you hit a roadblock:
No storage drives are detected.
This is a common issue, especially with laptops using RAID configurations and AMD storage controllers. But don’t worry—here’s a clear guide on how to resolve it and continue your installation smoothly.
Why Windows Can’t See the Drive
Unlike older systems or basic storage setups, many modern laptops (especially HPs) use RAID or advanced storage controllers. Windows installation media doesn’t come preloaded with every RAID or NVMe driver, especially for AMD systems.
On Intel machines, the usual solution is to download and load the Intel Rapid Storage Technology (RST) driver during installation. But on AMD laptops, things are a little different—and trickier.
Common (but Ineffective) Suggestions
You’ll find several recommendations online, such as:
Disabling RAID in BIOS
Enabling AHCI mode
Disabling CSM (Compatibility Support Module)
Turning off VMD (Volume Management Device)
These suggestions don’t always work—especially on HP BIOS setups, which often don’t even give you those options. And even if you could disable RAID, it’s not recommended. You’re better off using the proper RAID driver to maintain optimal performance and compatibility.
The Real Fix: Manually Load AMD RAID Drivers
Since HP doesn’t provide suitable AMD RAID drivers for some older models (and in many cases, doesn’t list Windows 11 drivers at all), the solution is to use compatible drivers from another vendor—like ASUS.
Steps to Install the AMD RAID Driver During Setup:
Download the AMD RAID Driver
Find a compatible AMD RAID driver—ASUS provides one that works well across different laptop brands. Search for something like “ASUS AMD RAID driver Windows 11”.
Extract the Driver Files
Even though it’s an executable, it usually gives you the option to extract the files. Choose that option instead of installing it.
Copy the Files to Your USB Installer
Paste the extracted driver folder to the root of the USB drive that you’re using to install Windows.
Boot Into Windows Setup Again
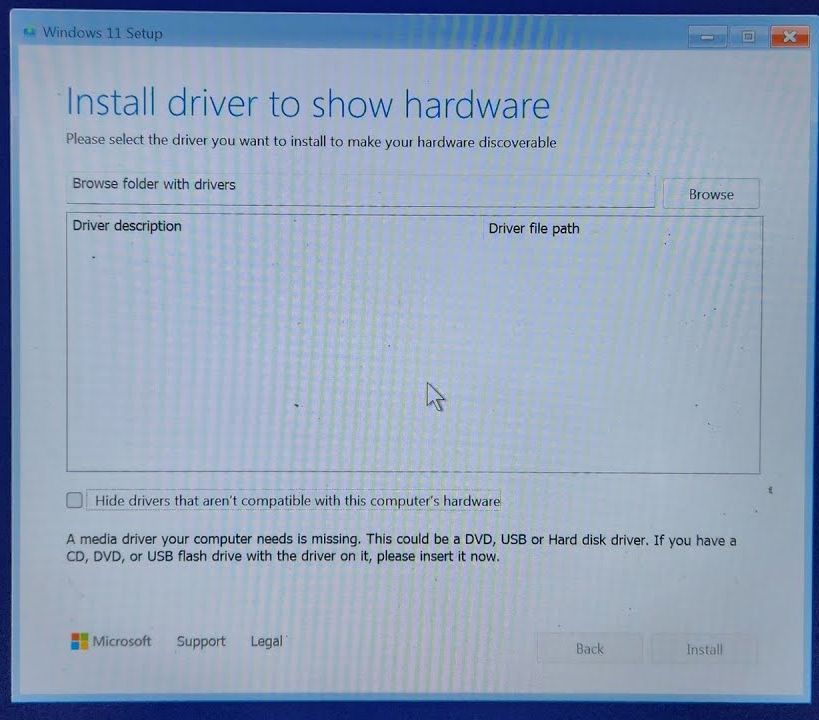
Boot the laptop using the same USB. Proceed until you reach the screen where no drives are detected.
Load the Driver Manually
Click Load Driver > Browse, then navigate to the folder where you placed the driver. Sometimes you’ll need to dive deeper into subfolders like RC RAID.
Install the Driver
Select the AMD RAID Controller driver when it appears and click Next. After a few moments, your SSD or HDD should appear in the list.
Proceed with Installation
Now that your storage is visible, you can continue with the Windows 11 installation as normal.
Bonus: Get the Driver
For convenience, here’s a link to the AMD RAID driver from ASUS:
AMD Raid Driver Raid_ROG_AMD_J_V9.3.1.00052_29515.exe
Is that driver did not work (especially if you are on a different AMD processor), try downloading drivers for your specific chipset from AMD website
As another example, driver for b650 chipset that works on all desktop motherboards regardless of brand can be located on Gigabyte website.