If you’re using a DJI remote control that doesn’t have its own screen, you’re probably pairing it with your smartphone. In that case, you can easily make screenshots and record the screen the usual way, just like any other smartphone. However, if you’re using a DJI remote control with a built-in screen, you might be wondering how to take a screenshot.
Why Take Screenshots on a DJI Remote Control?
Some may wonder why you’d need to capture screenshots on a DJI remote when the drone itself is capable of capturing both still images and video with its camera. The key difference is that a screenshot from your remote control will also include the information visible on your controller’s screen—things like flight stats, settings, and other essential data. There are several reasons why you might want to capture this:
Flight Information: Sometimes, you might want to keep a record of your drone’s flight data, such as GPS coordinates, battery level, or flight modes. A screenshot ensures you don’t forget this valuable information.
Proof of Settings or Malfunctions: If you encounter a malfunction or want to prove a certain setting was enabled, a screenshot can be a useful documentation tool.
Non-Recording Situations: Your drone doesn’t always record video, but if you enable screen recording on your remote, you can capture footage that might otherwise be lost—especially if you forget to press record on the drone itself.
Adding Commentary: While your drone captures beautiful footage, it doesn’t record sound. If you want to add commentary, connect a wireless or USB microphone to your remote and enable screen recording. This allows you to have audio alongside your drone footage, which can be synced during post-production.
As an example, I personally use screenshots of my DJI remote’s interface to create instructional videos, just like the one you’re reading now.
How to Take a Screenshot on Your DJI Remote Control
Your DJI remote control might feel like a specialized device, but it actually operates similarly to an Android smartphone. Whether you have a DJI RC model or the newer RC2, you can easily capture screenshots or screen recordings.
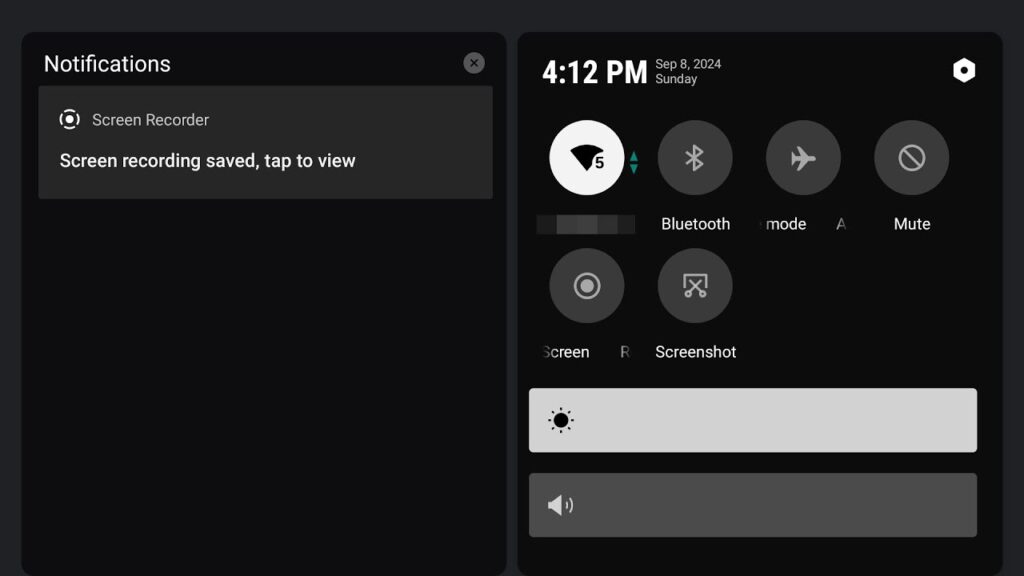
Swipe Down for the Menu: Your DJI remote runs on an Android-based system, so you can swipe your finger from the top of the screen to pull down the menu, just like you would on a phone. This menu includes options for taking screenshots and starting screen recordings.
Taking Screenshots: When you tap the screenshot option, there’s a slight delay to allow the menu animation to disappear. This ensures that the screenshot won’t be obstructed. Once captured, the screenshot will appear in your device’s gallery.
Screen Recording: The screen recording function works just like any Android device. After starting the recording, you’ll see a control on the screen that allows you to stop it when you’re done. Both screenshots and recordings can be accessed in your gallery.
Accessing Files: After capturing your screenshots or recordings, you can connect your remote to your computer. From there, navigate to the standard folder where the screenshots and videos are saved, and copy the files to your computer.
Alternative Ways to Take Screenshots
Since your DJI remote is essentially an Android device, there are a few alternative methods to capture screenshots:
Using a Bluetooth or Wired Keyboard: If you have a Bluetooth keyboard paired to your remote, pressing the “Print Screen” button will capture a screenshot. This also works with wired keyboards—just connect via a Type-C to Type-C cable. The best part is that there’s no delay when you use the keyboard; the screenshot is taken immediately.
Older DJI Controllers: For those using older controllers, like the RC Pro or DJI Smart Controller, there’s often a back button on the device. You can use a combination of the back button and joystick to take screenshots or start screen recordings. Newer controllers, however, have eliminated the back button in favor of a more streamlined design.
Final Thoughts
Taking screenshots and recording the screen on your DJI remote controller can be a great way to document flight data, prove your settings, and capture additional footage with sound or commentary. Whether you’re creating tutorials, troubleshooting, or simply recording for future reference, knowing how to properly capture this information will enhance your experience with DJI equipment. With various methods available, from the pull-down menu to keyboard shortcuts, it’s easier than ever to capture what you need for your drone projects.